
 |
| Yay! |
Secondly, I wanted to do another process post. This project has been a learning experience with many firsts. So far, I've written about the pencil drawings and inking, and I wanted to update this blog with some more detail about the digital side of these illustrations. This will get a bit technical, so if you don't care for the details, don't feel guilty about just scrolling through the pictures.
A quick tour of steps before colouring:
1. Pencil drawing
 |
| I knew I wanted to eventually colour the leaves different shades of green to give the foliage some depth. I don't usually paint over the pencil sketches, but for this page, I used paint to define each patch of leaves to plan ahead and make things less confusing during the next stages. |
2. Scan pencils, print pencils in blue, ink

3. Scan inks, digitally colour
I should start by touching on one of my most important goals for colouring - I needed to figure out how to avoid a case of the "white halos." Anyone who has attempted basic editing in Photoshop or Paint probably knows what I'm talking about - the unsightly blurry white outline that appears when you're trying to colour in an area next to a line:
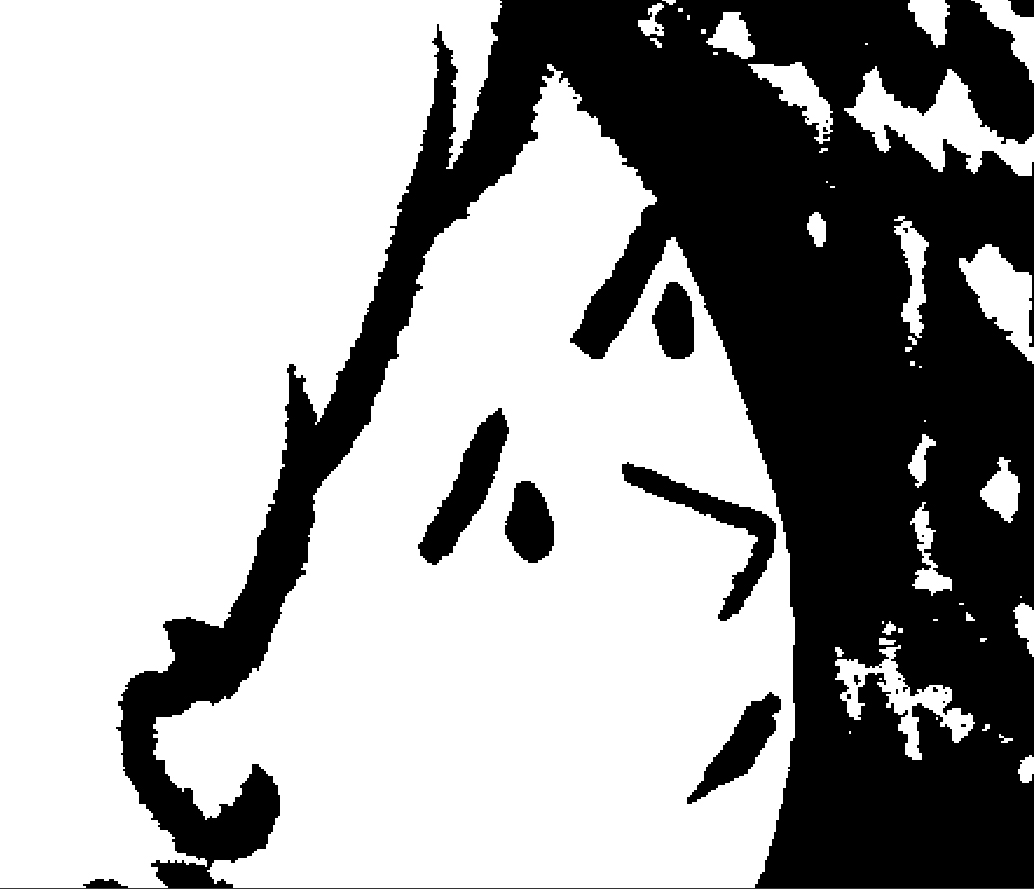
 |
| Grayscale image |
When you try to fill this with colour, this happens...
 |
| Using paint bucket on a grayscale image... ew fuzzy edges... |
I don't know the fancy computer graphics lingo to describe this, but in layman's terms, this happens when the line art is not purely black and white. If you look closely above, you can see pixels at the very edge of the black outlines that contain different shades of gray, which do not get filled with the paint bucket tool.
To avoid this, the line art needs be converted to purely black and white pixels, with no gray. This can be done in 2 main ways. (1) Scan line art with scanner software set to "black and white" mode, or (2) scan line art in grayscale, then apply "threshold" adjustment to the image in Photoshop. I used the 2nd method. "Threshold" can be found under Image > Adjustments > Threshold. After applying this to a grayscale image, you get this:
 |
| After applying "threshold" adjustment - black and white image, with no gray pixels |
Now when you fill with colour...
 |
| Using paint bucket on a black and white image |
 |
| Close-up comparison of filling a grayscale image (left) vs. filling a black and white image (right) |

After making sure all the line art is in black and white, I created a document in Photoshop with at least 2 basic layers: (1) line art, and (2) flats.
 |
| Layer 1: Line art |
"Flats" are areas of colour that are typically outlined by hand using the selection tools, and save to a layer beneath the line art layer (described very clearly in "How to Colour Inked Line Art in Photoshop" by Matt Fox, and this flatting tutorial from Bolt City). Manual flatting may be how the pros do it, but for my purposes, I found this too labour-intensive and cheated a bit - I just duplicated the line art layer, and used the paint bucket to fill in outlined areas, filling in details and missed spots with the pencil tool.
 |
| Layer 2: Colour "flats" |
Some other tips for maintaining non-blurry line art can be filled with colour without encountering "white halos:"
I also have a couple of additional layers, for the background (below) and shading (not shown).
- Set the Brush tool to "Pencil" mode
- Set the Eraser tool to "Pencil" mode
- When using the Paint Bucket tool, and any selection tools (marquee, lasso, magic wand), UNCHECK the "anti-alias" option. (Anti-alias is a software technique that smooths jagged, step-like lines - in our case, we want to maintain the crisp step-like lines for colouring purposes. As long as the line art was scanned at a high-resolution, you won't see the step-like lines when zoomed out, in the final print.)
I also have a couple of additional layers, for the background (below) and shading (not shown).
 |
| Layer 3: Background |
When all these layers are combined, you get this:
 |
| Still need to work on the shading before this page is fully done... |
There you have it! My system is a mish-mash of things I learned on the internet - there are so many helpful resources out there, from web tutorials to youtube videos. Although I have spent this post describing my preferred way of doing things, I'm sure there are many different ways to approach each step in the process.
Thanks again for all your support for this book! Phu and I have started sending out images to printers to look at samples, and I'll be picking up a preview copy from the printer tomorrow to make sure the quality meets our standards. We'll continue to keep you updated as we complete the final stages of this project!
No comments:
Post a Comment